 There are many ways to store and share documents online. Box, Dropbox, ShareFile, and Google Drive are but a few of the popular products. For firms using Microsoft 365 you already have an online document storage tool built in – MS OneDrive. What can you do with OneDrive, what are the pros and cons, what is the difference between it and SharePoint? Read on!
What is OneDrive?
Microsoft OneDrive comes with Microsoft 365 subscriptions and is also available on its own. For most law firms using business versions of the MS 365 suite (Apps, Basic, Standard, Premium), OneDrive comes with the subscription and gives each user 1TB of cloud storage. Like other file cloud storage services, you can share links to files and folders with other people. There are many permission settings you can enable. MS OneDrive also maintains versions of MS Office documents. If your OneDrive account is part of a MS 365 subscription you can also open MS Office documents and edit them in the browser or the installed software. People you share documents with, even if they do not have Microsoft Office or a MS 365 subscription, can edit or comment on documents in their browser.
OneDrive versus SharePoint
In Microsoft parlance, OneDrive is the “me” drive and SharePoint is the “we” drive. The pre-cloud equivalent of OneDrive is your C: drive (local) and SharePoint is the equivalent to a file server (sometimes your Y: or X: drive) where all shared files for the firm are stored. Documents saved to a SharePoint library or in a Teams channel are automatically shared with others in the firm if they were given permissions when the library or channel was created. In OneDrive you can choose to share a file or folder with anyone in your firm, or outside your firm, but the process to share the information is triggered by your actions. The easiest way to see all the files shared by you and with you in OneDrive, as well as the document libraries in Teams or SharePoint, is to go to Office.com and login with your business account then click on OneDrive. You will see all your “personal” files as well as any SharePoint libraries you have access to.
Getting Started
If you tend to create documents using the MS Office software (Word, PowerPoint, Excel) versus in the browser you will want to make sure those documents are set up to synchronize with OneDrive so that you can access them from any device. This set up is like adding a mapped drive, and you may have already done something similar if you set up sync with Google Drive, Dropbox, Box or other cloud storage provider in the past. Here are the instructions from Microsoft. Once you have this set up you can drag and drop files or folders from your computer or a file server to your OneDrive sync.
When you create documents in the browser through your Office.com account those files will automatically be saved to your OneDrive in a default Documents folder unless you specify a different folder. – even if you forgot to give the file a name.
Windows Explorer versus OneDrive App
There are several ways to view your OneDrive files and folders. You can view them through Windows Explorer, through the installed OneDrive app on your computer, or by going to Office.com and navigating to OneDrive. Of all these methods you will be able to see the most information about files you have created, what you have shared, what has been shared with you, and any SharePoint libraries you have access to by going to OneDrive through Office.com. For this reason, you may want to add a shortcut to OneDrive through Office.com to your desktop, pin it to your taskbar, or add it to your tiles in the Start Menu.
Sharing Files and Folders
 To share a file or folder from OneDrive, navigate to OneDrive in your browser through Office.com. Locate the file or folder you want to share and place your mouse cursor atop it.
An icon with an arrow will appear to the right of the file/folder name. Click on the icon. The default permission is “People you specify can view”. If that is acceptable type in the name of the person (or persons) you want to share the file/folder with.
You will see a list of contacts from your Outlook contacts. Choose one or type in the person’s email address. Add a message if you like and click “Send”. If you would prefer to copy the link to the shared file you can copy the link and paste it anywhere or click “Outlook” to send the link through MS Outlook.
If you want to share a document you are working on in Office (software or online) just click on the “Share” button at the top right of the screen.
Permissions
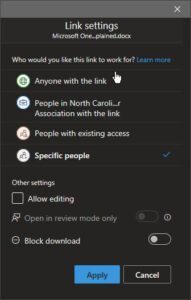
While the default sharing option is read only for people you specify, click in the pop-up window to explore other options. You can choose:
- “anyone with the link” – which is useful if you are unsure if the recipient has a Microsoft account or does not want to create one. The options you have if you choose “anyone with the link” include whether to allow editing, open in review mode only, create an expiration date, set a password, and block download. If you choose to let the person edit the shared document, you CANNOT block download.
- “people in your firm/organization/company “and select whether the person can edit. You can block downloading only if they are not allowed to edit.
- “people with existing access”, which is useful if you had previously shared the file or folder with someone and they lost the link
Reviewing and Revoking Access
In OneDrive in the browser, you can easily see whether a file or folder has been shared. In My Files you will see columns with the folder and file names, date modified, who it was modified by, file size and Sharing. In the Sharing column you will see “private” or “shared”. If it is shared click to open a “Manage Access” panel. You can stop sharing, change permissions and see who the file was shared with – unless you shared a file using “Anyone with the Link”.
If you mouse over, but do not click, a file name you will see intelligence about the file. Hover over the file name to see how many times the file was viewed, who viewed it, who has access, an “inside look” that shows the first few sentences of the document if it is in Word, and how long it takes to read. If you shared the file via a link in email you will also be able to open the email thread associated with that file directly from OneDrive.
Sharing Files Through Outlook
 If you are more likely to share a document via email instead of going to OneDrive be sure to take advantage of sharing a link to the file, rather than attaching the file. Why? You will retain more control over who has access (and can revoke access), maintain version control, get notified automatically when the file has been accessed (way better than a “read receipt”), and more.
In a new email message in the Message tab look in the “Include” group. You will see options to “Attach a file”, “Include a link” or “Include a signature”. If you click “Attach File” a list of files you have recently accessed or edited will appear. If you choose “Browse This PC” it will open Windows Explorer. Any file you choose will be attached as usual. If you choose to “Browse Web Locations” you will have some different options.
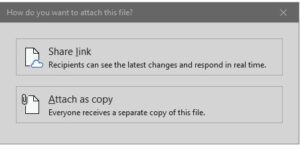
Choose “Browse Web Locations” and then choose OneDrive or SharePoint. Locate the file you want to share and a pop-up box will prompt if you want to “Share a Link” or “Attach a Copy”. Click “Share a Link”. The default permission is “Recipients can view”. If you want to edit the permissions click on the arrow next to the attachment and select “Change Permissions”. You can change who can access the file (anyone, organization, or recipient) and whether they can view only or edit. If you need to make further refinements like expirations dates, download restrictions, etc. you can manage access through OneDrive online.
Versions
![]() Files saved in OneDrive maintain versions. Whether you or a collaborator make a change you can view and revert to previous versions. From OneDrive find the file and then mouse over the file name and you will see an ellipsis appear (…). Click on the ellipses to see a variety of options, including Version History. Or open the document in MS Word, click on File and then Info. Click on the Version History box to see all the versions based on edits made by you and anyone you gave permission to edit the document. It does not matter whether you or other editors made the changes in MS Word software or in the browser. All the versions will appear. You can select a version and compare it to another version or restore it as the current version.
Files saved in OneDrive maintain versions. Whether you or a collaborator make a change you can view and revert to previous versions. From OneDrive find the file and then mouse over the file name and you will see an ellipsis appear (…). Click on the ellipses to see a variety of options, including Version History. Or open the document in MS Word, click on File and then Info. Click on the Version History box to see all the versions based on edits made by you and anyone you gave permission to edit the document. It does not matter whether you or other editors made the changes in MS Word software or in the browser. All the versions will appear. You can select a version and compare it to another version or restore it as the current version.
Conclusion
OneDrive shares many features and functions with other online document storage services, with the benefit of seamless workflows for saving, accessing, and sharing files within Microsoft 365 products. With generous storage space, lots of control and vast improvements since the earlier versions of OneDrive, it may be time to consider switching from your existing online document storage – after all, you are already paying for it.
